4K
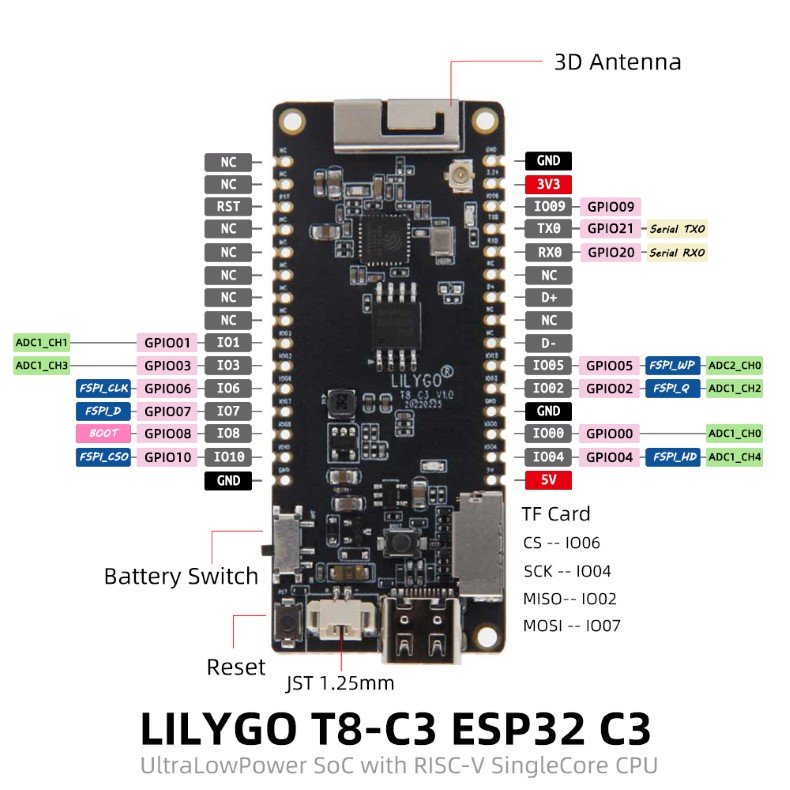
In this article we look at another board from Lilygo, this time its based on the ESP32-C and is called the T8-C3 ESP32-C3 Development Board.

Since this is mainly a development board for the ESP32-C3 we will look at that.
The specs of the ESP32-C3 microcontroller are as follows
Specification
Basic Parameter
- Operating Voltage: 3.3V
- Type-C Input Voltage: 5V DC
- VIN Input Voltage: 5V DC
- Operating Current: 25mA
- Maximum Charging Current: 400mA
- Operating Temperature: -40~105℃
- Size: 25 x 20.5mm/0.98 x0.81”
Hardware Parameter
- Processor: 32bit RISC-V Single-core processor
- Main Frequency: 160 MHz
- SRAM: 400KB
- ROM: 384KB
- Flash: 4MB
- RTC SRAM: 8KB
- Clock: external crystal(32kHz); internal fast RC oscillator 17.5MHz(adjustable); PLL clock
- USB: USB 2.0 Up to 12Mbit/s
WiFi
- WiFi Protocol: IEEE 802.11b/g/n
- Bandwidth: Supports 20 MHz, 40 MHz bandwidth in 2.4GHz band
- WiFi Mode: Station, SoftAP, SoftAP+Station and promiscuous mode
- WiFi Frequency: 2.4GHz
- Frame Aggregation: TX/RX A-MPDU, TX/RX A-MSDU
Bluetooth
- Bluetooth Protocol: Bluetooth 5, Bluetooth mesh
- Bluetooth Frequency: 125 Kbps, 500 Kbps, 1 Mbps, 2 Mbps
Ports
- Digital I/O x13
- LED PWM 6 Channel
- SPI x1
- UART x2
- I2C x1
- I2S x1
- IR Transceiver: transmit channel x2, receive channel x2(random pin)
- 2 × 12-bit SAR ADCs, up to 6 channels
- DMA controller, with 3 transmit channels and 3 receive channels
Development
There are several development options, I prefer the Arduino IDE or using Micropython with an IDE like Thonny
PlatformIO
- Install VSCODE and Python
- Search for the PlatformIO plug-in in the VSCODE extension and install it.
- After the installation is complete and the reload is completed, there will be a small house icon in the lower left corner. Click to display the Platformio IDE home page
- Go to file – > Open folder – > Select the T8-C3 folder and click the (√) symbol in the lower left corner to compile (→) for upload.
Arduino IDE
- Install the current upstream Arduino IDE at the 1.8 level or later. The current version is at the Arduino website.
- Start Arduino and open Preferences window. In additional board manager add url: https://raw.githubusercontent.com/espressif/arduino-esp32/gh-pages/package_esp32_index.json .separating them with commas.
- Select Tools -> Board -> ESP32C3 Dev Module
Micropython
- Download and upload the firmware
- Note that the firmware upload address is 0x0, not 0x1000.
Purchase
Again their are 2 options, one with the uploader tool and another without. The basic version is the equivalent of £4.70 and with the uploader it is £9.50
LILYGO® T8-C3 ESP32-C3 Development Board
Links
https://www.espressif.com/sites/default/files/documentation/esp32-c3_datasheet_en.pdf
