
In this article we look at an add-on hat for the M5StickC and M5StickC-plus called the ENV 3 sensor.
The env 3 hat is able to detect the temperature, humidity and air pressure.
This product relates via I2C protocol which allows you to obtain 3 types of environment data thru just 2 pins, together with the tiny body, makes it a powerful application for environment data collecting.
The sensor comes with a cable for connecting it to the m5stick base unit
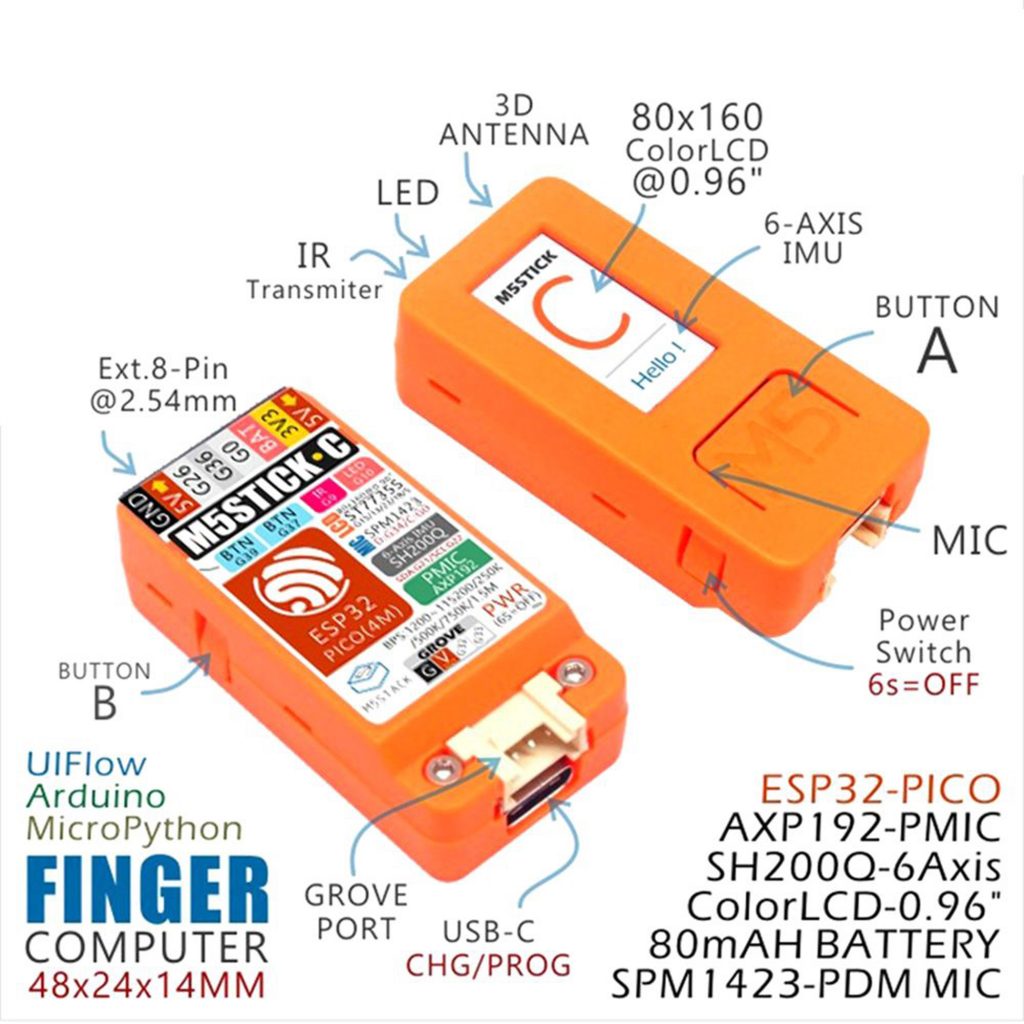
M5Stick C
It comprises of the following sensors
SHT30 : SHT30 is a high-precision and low-power digital temperature and humidity sensor
QMP6988 : QMP6988 is an absolute air pressure sensor specially designed for mobile applications, with high accuracy and stability, suitable for environmental data collection and detection types of projects.
Specification
| Resources | Parameter |
|---|---|
| Maximum temperature measurement range | -40 ~ 120 ℃ |
| Highest measurement accuracy | 0 ~ 60 ℃/±0.2℃ |
| Humidity measurement range/error | 10 ~ 90 %RH / ±2% |
| Maximum measured value of air pressure/resolution/error | 300 ~ 1100hPa / 0.06Pa / ±3.9Pa |
| Communication protocol | I2C: SHT30(0x44), QMP6988(0x70) |
| Working temperature | 32°F to 104°F (0°C to 40°C ) |
Purchase
Layout
I used the grove port to connect the sensor to the M5StickC

m5stick and env 3
Code
For Arduino development you need to add ESP32 support via the board manager by adding the following ESP32 Boards Manager url to the Additional Boards Manager URLs:
https://dl.espressif.com/dl/package_esp32_index.json
Once all of the required files are downloaded then you need to Navigate to Tools->Board:->Boards Manager and then Search ESP32 in the pop-up window, find it and click Install
Under Tools->Board:-> ESP32 Arduino you will see M5Stick-C in the list
You can then install the MStickC library like this
Open Arduino IDE, then Select Sketch->Include Library->Manage Libraries. Search M5StickC , find it and click Install.
You can find the example below under examples -> Unit -> ENVIII_SHT30_QMP6988
[codesyntax lang=”cpp”]
#include <M5StickC.h>
#include "Adafruit_Sensor.h"
#include <Adafruit_BMP280.h>
#include "UNIT_ENV.h"

SHT3X sht30;
QMP6988 qmp6988;

float tmp = 0.0;
float hum = 0.0;
float pressure = 0.0;

void setup() {
  M5.begin(); //Init M5StickC.  初始化M5StickC
  M5.Lcd.setRotation(3);  //Rotate the screen.
  Wire.begin(); //Wire init, adding the I2C bus.
  qmp6988.init();
  M5.lcd.println(F("ENV Unit III test"));
}

void loop() {
  pressure = qmp6988.calcPressure();
  if(sht30.get()==0){ //Obtain the data of shT30.  获取sht30的数据
    tmp = sht30.cTemp;  //Store the temperature obtained from shT30.
    hum = sht30.humidity; //Store the humidity obtained from the SHT30.
  }else{
    tmp=0,hum=0;
  }
  M5.lcd.fillRect(0,20,100,60,BLACK); //Fill the screen with black (to clear the screen)
  M5.lcd.setCursor(0,20);
  M5.Lcd.printf("Temp: %2.1f  \r\nHumi: %2.0f%%  \r\nPressure:%2.0fPa\r\n", tmp, hum, pressure);
  delay(2000);
}
[/codesyntax]
When you run this it should display various readings on the display
Links