In this example we will create a basic web server with an ESP32, we will then serve a we page with an on and off button which will switch an LED on and off
Parts Required
1x ESP32 Dev Module (Lolin32)
1x LED
1x Breadboard
1x 470 Ohm Resistor
Jumper wires
Layout
This was the best ESP32 fritzing part I could find
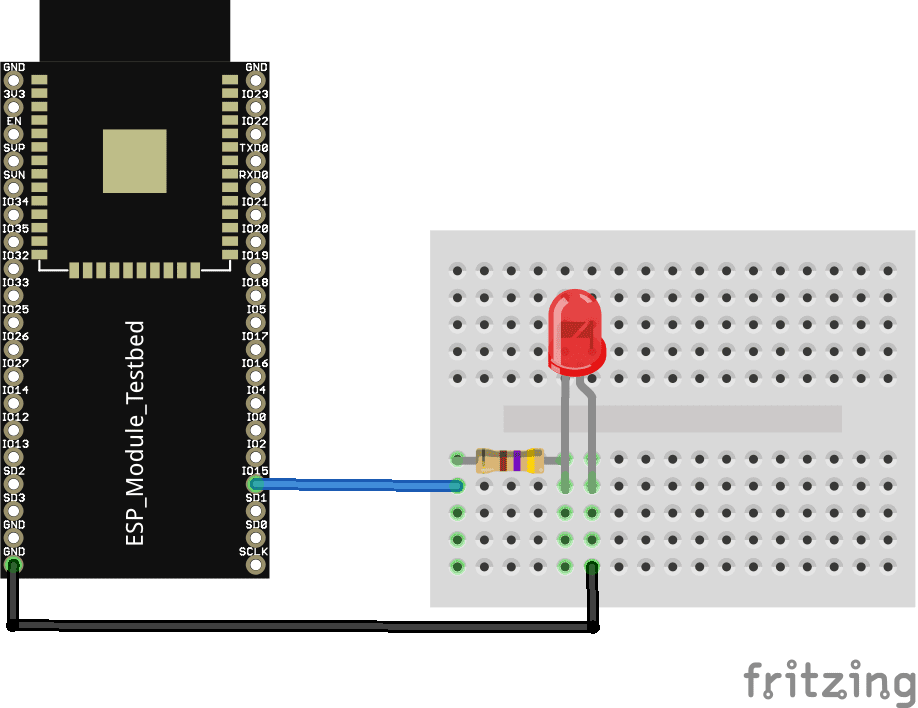
esp32 and led layout
Code
Adding support for ESP32 boards – showed how to add support to the Arduino IDE
[cpp]
#include <WiFi.h>
// Replace with your network credentials
const char* ssid = “iainhendry”;
const char* password = “iain061271”;
WiFiServer server(80);
const int led = 15; // the number of the LED pin
// Client variables
char linebuf[80];
int charcount=0;
void setup()
{
// initialize the LED as an output:
pinMode(led, OUTPUT);
//Initialize serial and wait for port to open:
Serial.begin(115200);
while(!Serial) {
}
// We start by connecting to a WiFi network
Serial.println();
Serial.println();
Serial.print(“Connecting to “);
Serial.println(ssid);
WiFi.begin(ssid, password);
// attempt to connect to Wifi network:
while(WiFi.status() != WL_CONNECTED)
{
// Connect to WPA/WPA2 network.
delay(500);
Serial.print(“.”);
}
Serial.println(“”);
Serial.println(“WiFi connected”);
Serial.println(“IP address: “);
Serial.println(WiFi.localIP());
server.begin();
}
void loop()
{
// listen for incoming clients
WiFiClient client = server.available();
if (client)
{
Serial.println(“New client”);
memset(linebuf,0,sizeof(linebuf));
charcount=0;
// an http request ends with a blank line
boolean currentLineIsBlank = true;
while (client.connected())
{
if (client.available())
{
char c = client.read();
Serial.write(c);
//read char by char HTTP request
linebuf[charcount]=c;
if (charcount<sizeof(linebuf)-1) charcount++;
if (c == ‘\n’ && currentLineIsBlank)
{
// send a standard http response header
client.println(“HTTP/1.1 200 OK”);
client.println(“Content-Type: text/html”);
client.println(“Connection: close”); // the connection will be closed after completion of the response
client.println();
client.println(“<!DOCTYPE HTML><html><head>”);
client.println(“<meta name=\”viewport\” content=\”width=device-width, initial-scale=1\”></head>”);
client.println(“<h1>ESP32 – Web Server example</h1>”);
client.println(“<p>LED <a href=\”on\”><button>ON</button></a> <a href=\”off\”><button>OFF</button></a></p>”);
client.println(“</html>”);
break;
}
if (c == ‘\n’)
{
// you’re starting a new line
currentLineIsBlank = true;
if (strstr(linebuf,”GET /on”) > 0)
{
Serial.println(“LED ON”);
digitalWrite(led, HIGH);
}
else if (strstr(linebuf,”GET /off”) > 0)
{
Serial.println(“LED OFF”);
digitalWrite(led, LOW);
}
// you’re starting a new line
currentLineIsBlank = true;
memset(linebuf,0,sizeof(linebuf));
charcount=0;
}
else if (c != ‘\r’)
{
// you’ve gotten a character on the current line
currentLineIsBlank = false;
}
}
}
// give the web browser time to receive the data
delay(1);
// close the connection:
client.stop();
Serial.println(“client disconnected”);
}
}
[/cpp]
Testing
Open the serial monitor to get the assigned IP address, in your favourite web browser navigate to this IP address
This is my example
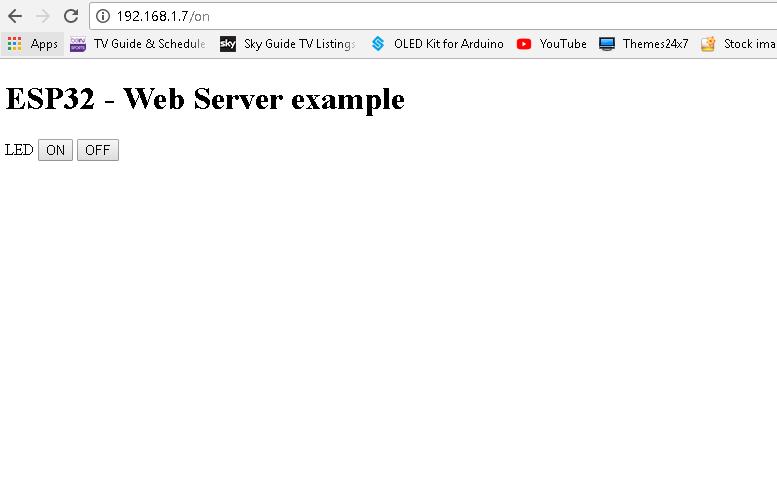
esp32 webpage
Now press the on and off button and check if the LED flashes
Links
You can pick up a module for about $8
Official DOIT ESP32 Development Board WiFi+Bluetooth Ultra-Low Power Consumption Dual Core ESP-32